Make your own gwoka. - Step by step explanation.
72 posts
• Page 3 of 5 • 1, 2, 3, 4, 5
![]() by akdom » Thu Sep 29, 2005 5:40 pm
by akdom » Thu Sep 29, 2005 5:40 pm
Tie the end of the rope around the first loop. You will have to tie and untie this knot a few times, so don’t tie it too strong.
Attachment: http://mycongaplace.com/forum/eng/uploa ... 615-30.jpg
Attachment: http://mycongaplace.com/forum/eng/uploa ... 615-30.jpg

-

akdom - Posts: 607
- Joined: Tue Jan 21, 2003 10:16 pm
- Location: France
![]() by akdom » Thu Sep 29, 2005 5:41 pm
by akdom » Thu Sep 29, 2005 5:41 pm
You should be able to pull the skin from the inside of the rings with your hands and remove as many folds as possible.
Attachment: http://mycongaplace.com/forum/eng/uploa ... 686-31.jpg
Attachment: http://mycongaplace.com/forum/eng/uploa ... 686-31.jpg
-
akdom - Posts: 607
- Joined: Tue Jan 21, 2003 10:16 pm
- Location: France
![]() by akdom » Thu Sep 29, 2005 5:43 pm
by akdom » Thu Sep 29, 2005 5:43 pm
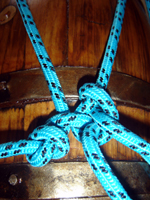
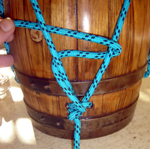
This step is optional, but just like the “cross”(25) I decided to show it so that you have as many options according to how your drum making is going on.
I use here what we sometimes call a Mali weave. This is the way Djembes are tuned. Follow the pattern on the picture and finish the knot by pulling the rope towards your right hand side and slightly down at the same time. Repeat this 4 times all around the drum.
On bigger drums, it can be helpful to use a Mali weave in addition to the regular key tension system.
(If you didn’t pull the rope too much this will stretch the skin nicely. If you pulled the rope too much, you might not be able to go all around the drum and/or the rings and skin will slide on one side. If this is the case, release the tension or go to step 33).
Once you finished the Mali weave, untie it and pull the excess of rope like in 29.
Attachment: http://mycongaplace.com/forum/eng/uploa ... 794-32.jpg
-
akdom - Posts: 607
- Joined: Tue Jan 21, 2003 10:16 pm
- Location: France
![]() by akdom » Thu Sep 29, 2005 5:44 pm
by akdom » Thu Sep 29, 2005 5:44 pm
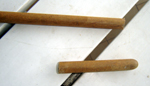
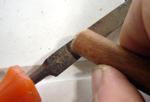
It is now time to make the keys (or pegs). I personally use drumsticks because they are made out of hard wood and are perfectly round. Any other idea is welcome here. Traditionally people use “natural” hard wood that they carve at the correct size.
4 pieces of about 10 centimeters (4 inches) should be OK. You can make 3 keys out of one drumstick so make sure you have two of them.
Attachment: http://mycongaplace.com/forum/eng/uploa ... 894-33.jpg
4 pieces of about 10 centimeters (4 inches) should be OK. You can make 3 keys out of one drumstick so make sure you have two of them.
Attachment: http://mycongaplace.com/forum/eng/uploa ... 894-33.jpg
-
akdom - Posts: 607
- Joined: Tue Jan 21, 2003 10:16 pm
- Location: France
![]() by akdom » Thu Sep 29, 2005 5:46 pm
by akdom » Thu Sep 29, 2005 5:46 pm
Using a file or sand paper, slightly smoothen the edge of the keys to remove splinters.
Attachment: http://mycongaplace.com/forum/eng/uploa ... 970-34.jpg
Attachment: http://mycongaplace.com/forum/eng/uploa ... 970-34.jpg
-
akdom - Posts: 607
- Joined: Tue Jan 21, 2003 10:16 pm
- Location: France
![]() by akdom » Thu Sep 29, 2005 5:47 pm
by akdom » Thu Sep 29, 2005 5:47 pm
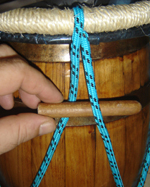
Place the key in between the rope as shown on the picture…
Attachment: http://mycongaplace.com/forum/eng/uploa ... 038-35.jpg
Attachment: http://mycongaplace.com/forum/eng/uploa ... 038-35.jpg
-
akdom - Posts: 607
- Joined: Tue Jan 21, 2003 10:16 pm
- Location: France
![]() by akdom » Thu Sep 29, 2005 5:50 pm
by akdom » Thu Sep 29, 2005 5:50 pm
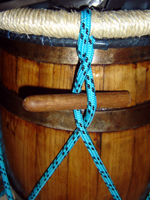
…Then give the key half a spin. Do the same with the 3 other keys. Once the 4 keys are set, slide them downwards. This will stretch the skin a bit more and give you more room to make more turns.
Give one new turn at a time to the keys going around the drum until you reach the sound you want. While doing that, check that the skin and rings stay centered.
If the skin doesn’t stretch enough after a few key spins, release the keys and go back to step 29. You might have to repeat this a couple of time according to the type and quality of skin you have.
In the end, the skin should be stretch enough to give a warm sound to the drum and the top ring should be flush with or slightly lower than the skin.
If the top ring is higher than the skin, it means that you stretched it too much when you first set it (28) or when you removed the folds (31). Most of the time, stretching the skin a little bit more can fix that problem.
If the top ring is much lower than the skin, it means that you didn’t stretch the skin enough when you set it (28). To fix this, remove the keys and try pulling the skin like explained in (31) then follow the rest of the steps again.
Attachment: http://mycongaplace.com/forum/eng/uploa ... 202-36.jpg
-
akdom - Posts: 607
- Joined: Tue Jan 21, 2003 10:16 pm
- Location: France
![]() by akdom » Thu Sep 29, 2005 5:51 pm
by akdom » Thu Sep 29, 2005 5:51 pm
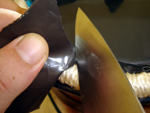
You now have to cut the excess of skin. If you are using a natural skin, I recommend using a razor blade (with care for your fingers and the skin). For this drum, I used a sharp knife.
Pull up the excess of skin with one hand and cut it as short as possible with the blade all around the drum.
Attachment: http://mycongaplace.com/forum/eng/uploa ... 284-37.jpg
Pull up the excess of skin with one hand and cut it as short as possible with the blade all around the drum.
Attachment: http://mycongaplace.com/forum/eng/uploa ... 284-37.jpg
-
akdom - Posts: 607
- Joined: Tue Jan 21, 2003 10:16 pm
- Location: France
![]() by akdom » Thu Sep 29, 2005 5:52 pm
by akdom » Thu Sep 29, 2005 5:52 pm
Here, I am finishing the work using a pair of clippers. The knife couldn’t cut the X-ray film short enough.
Attachment: http://mycongaplace.com/forum/eng/uploa ... 377-38.jpg
Attachment: http://mycongaplace.com/forum/eng/uploa ... 377-38.jpg
-
akdom - Posts: 607
- Joined: Tue Jan 21, 2003 10:16 pm
- Location: France
![]() by akdom » Thu Sep 29, 2005 5:56 pm
by akdom » Thu Sep 29, 2005 5:56 pm
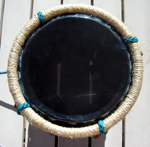
The drum is now finished. This picture shows the head of the drum. Note that the rings are well centered with the top of the drum.
Attachment: http://mycongaplace.com/forum/eng/uploa ... 561-39.jpg
Attachment: http://mycongaplace.com/forum/eng/uploa ... 561-39.jpg
-
akdom - Posts: 607
- Joined: Tue Jan 21, 2003 10:16 pm
- Location: France
![]() by akdom » Thu Sep 29, 2005 5:57 pm
by akdom » Thu Sep 29, 2005 5:57 pm
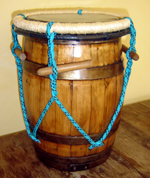
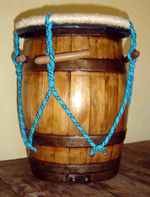
These are general views of the finished Gwoka. This drum is quite small and has a sharp and crisp sound. The X-ray skin is perfect to play outside since it is not affected by moisture.
Attachment: http://mycongaplace.com/forum/eng/uploa ... 660-40.jpg
Attachment: http://mycongaplace.com/forum/eng/uploa ... 660-40.jpg
-
akdom - Posts: 607
- Joined: Tue Jan 21, 2003 10:16 pm
- Location: France
![]() by akdom » Thu Sep 29, 2005 6:00 pm
by akdom » Thu Sep 29, 2005 6:00 pm
Here it is.
I hope this can be useful.
Of course feel free to send comments to these posts.
This step by step make your own Gwoka will be part of my soon to be website plapata.com
have a look at the online press kit.
See ya
B
Attachment: http://mycongaplace.com/forum/eng/uploa ... 806-41.jpg
I hope this can be useful.
Of course feel free to send comments to these posts.
This step by step make your own Gwoka will be part of my soon to be website plapata.com
have a look at the online press kit.
See ya
B
Attachment: http://mycongaplace.com/forum/eng/uploa ... 806-41.jpg
-
akdom - Posts: 607
- Joined: Tue Jan 21, 2003 10:16 pm
- Location: France
![]() by GuruPimpi » Thu Sep 29, 2005 6:32 pm
by GuruPimpi » Thu Sep 29, 2005 6:32 pm
Akdom!
Waw, very ilustrative, documentaric like a National Percussionographic and must say i'm amazed!
Thank You for this richful How-to knowledge.
Primozz
Waw, very ilustrative, documentaric like a National Percussionographic and must say i'm amazed!
Thank You for this richful How-to knowledge.
Primozz
It's about liberating yourself, man!!!
http://www.myspace.com/odfranclnamozgani
http://www.myspace.com/perkakns
http://www.myspace.com/strojmachine
http://www.myspace.com/robertjerele
http://www.myspace.com/odfranclnamozgani
http://www.myspace.com/perkakns
http://www.myspace.com/strojmachine
http://www.myspace.com/robertjerele
-
GuruPimpi - Posts: 487
- Joined: Thu Dec 09, 2004 2:12 am
- Location: Slovenija
72 posts
• Page 3 of 5 • 1, 2, 3, 4, 5
Who is online
Users browsing this forum: No registered users and 6 guests