Vintage Gon Bops - a new project!
![]() by Chupacabra » Sat Feb 23, 2008 8:18 am
by Chupacabra » Sat Feb 23, 2008 8:18 am
There isn't any sure-fire way for the average home craftsman to clamp a drum shell to close a crack, as far as I know. Because of the variables (shape, surface, location of crack, grain of wood, etc.), it is pretty much a case by case approach. The most common tools that I have used are thick, sturdy elastic bands (strips of heavy tire inner tubes), 1/2" plywood cut to required shapes for counter- pressure rings, nylon rope, ratchet straps, and it goes on as far as your experience and imagination will take you! Some cracks aren't worth closing, just fill them in with glue, or maybe a mix of glue and sawdust from the same drum, if that's practical.
If you go with the fill-in method you should drill a small hole through the shell at the end of the crack, fill the crack first and let the glue dry then fill in the hole.
Clamping a drum shell, no matter what type can have risks. You may place more stress on a shell that is obviously already stressed out and if you don't think about what you are doing you might do more harm than good!
I ain't no expert, but that's what I've learned so far!
... --- ... ... --- ... ...---...
- Chupacabra
- Posts: 349
- Joined: Mon Dec 03, 2007 2:57 am
- Location: Ontario, Canada
![]() by Mike » Sat Feb 23, 2008 8:59 am
by Mike » Sat Feb 23, 2008 8:59 am
The topic of repairing cracks has often been discussed,
e.g. here http://www.congaplace.com/cgi-bin....l=crack
and there:
http://www.congaplace.com/cgi-bin....;t=3536
No matter if bongó or tumbadora, the basic methods of fixing them seem to be similar.
Best wishes
Mike
e.g. here http://www.congaplace.com/cgi-bin....l=crack
and there:
http://www.congaplace.com/cgi-bin....;t=3536
No matter if bongó or tumbadora, the basic methods of fixing them seem to be similar.
Best wishes
Mike
Peace & drum
-

Mike - Posts: 2195
- Joined: Wed Mar 28, 2001 6:00 pm
- Location: Germany
![]() by blango » Sat Feb 23, 2008 2:10 pm
by blango » Sat Feb 23, 2008 2:10 pm
to me, all cracks are worth closing, and should never be filled, unless some of the original wood is missing. Filling a crack makes it hard to repair correctly in the future.
Its not like repairing furniture. The shell must resonate as one piece, and any fill will prevent the transmission of vibration, killing the sound of the shell.
To close the average crack, belt clamps will work, but if you have serious issues, bind it with heavy rope and twist it tight with metal pipe.
hope that helps,
Tony
Edited By blango on 1203775983
- blango
- Posts: 343
- Joined: Sat May 26, 2007 9:00 pm
- Location: Napa, ca
![]() by Isaac » Sat Feb 23, 2008 4:40 pm
by Isaac » Sat Feb 23, 2008 4:40 pm
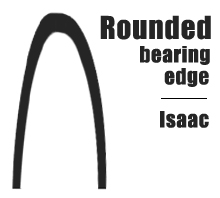
No, this is not half of the McDonalds Logo.
I've tried to draw an even bearing edge that will have a slight
flat area on top, but with some angled opening ( sound cone
like on a speaker) to give it some edge. It's a combination
of two approaches.
If too flat on top it's not right, and too sharp
also makes for an overly ringing sound. The Valje bongos intentionally
go for that sharper edge for a more cutting sound. But for
an authentic traditional sound, less sharper curve is the way to go.
~ ISAAC
TRADICION PERCUSSION / REP. JCR
Attachment: http://mycongaplace.com/forum/eng/uploa ... ngedge.jpg
-

Isaac - Posts: 512
- Joined: Sun Feb 15, 2004 10:53 am
- Location: Canada
![]() by BMac » Fri Feb 29, 2008 8:33 pm
by BMac » Fri Feb 29, 2008 8:33 pm
I might have missed this idea already posted here ... but for you that are trying to define a plane for the bearing edge using sanding boards and sidewalks and such ... I recommend a hand plane. Planes define planes. That's what planes do.
I've gone the sanding board route ... I never thought of an approach so rough as a sidewalk but that's an innovative and inexpensive solution. What I've found, as some have mentioned, is that the piece, whether its a drum or box or a board or whatever, tends to wobble as you move it trying to sand it. So you get uneven results.
So I finally got around to going to a nice specialty hardware store to buy a fine hand plane. I had seen you could spend hundreds of dollars on a single plane. A gentleman there asked me about my needs and suggested a $35 Stanley model with some sharpening accessories. I got everything for well under $60. The guy convinced me that the less expensive model, with proper care and set up, would work as well as beautiful costlier models. He said the main difference performance-wise was just that the craftsmen that make the finer models take the time to sharpen the blade properly and polish the base. He said the price difference was really more about beauty. People get freaky about their hand planes. Oh well, I suppose they think we freaky about our drums. So, if you're interested in hand planing, get some info and take some time (an hour or two) setting up the hand plane properly. Once it's set up, it will stay sharp and ready to go for a long time.
I had put off trying a plane because the ones I had tried before were bummed up and dull and chipped ... you gotta treat a hand plane right. Don't drop it ... don't bang it around in your tool box. But if they're treated right ... they're amazing.
That hand plane has become one of my most used tools. I haven't touched a sand-paper board since. The precision of a hand plane over a home-made sanding board is dramatic. How flat is flat? A hand plane can get flat as flat as flat gets.
I've fine-tuned several drums with that hand plane. You can't define the inside bevel of course. But you can establish an absolutely planar top bearing edge. You can also define the outside bevel to whatever precision your hands and patience can deliver. Move the plane circumferentially around the edge. You gotta set the blade depth shallow and work slowly because you're crossing the end grain. Don't get agressive, it'll just bite and drag and chew. With a hand plane, you can get far more precise results than with a palm sander or sanding board on both the top edge and the outside bevel.
Try it ... you'll like it!
As far as cracks go ... some say that closing a crack transfers or re-instates the stress that caused the crack, so the stress may one day re-open the crack or cause a new one. Also, glues dry as they harden ... they withdraw ... losing moisture to the air. So a crack filled with wet glue tends to cavitate and re-open as the glue dries. Here's my solution: use epoxy. I use a two-part West System epoxy. Goo that epoxy into a crack, replinishing or containing the epoxy as necessary as it tries to flow out. Epoxy doesn't dry ... it cures. The resin and hardener are mixed in a stoichiometrically correct ratio to form a hard binding solid without shrinkage or evaporation, so the the crack stays filled, if the epoxy stays put, as the epoxy cures.
The epoxy flows into wide cracks and can be worked into narrow cracks with dental floss. In some situations I've used tape to contain the epoxy. You can apply tape to the outside of a cracked drum, lay the thing down on the cracked side, and pour epoxy into the crack from inside of the drum ... letting the tape contain the epoxy from below, the crack acts like a trough with the tape being the bottom of the trough. Sometimes I let the first application cure and add more epoxy in a second or third application to completely fill a crack. It may not be the best professional repair, you don't get good wood-on-wood contact, but epoxy makes for quick and strong repairs any hobbyist can apply without belts or jigs or clamps.
I've applied epoxy repairs to several drums having cracks of several inches in length and under. I haven't repaired a big long drum-splitting crack like you see in the link someone suggested above. But for small repairs, you can just fill the crack with epoxy, sand off the excess after curing is complete, refinish the affected area, and play the drum!
Oh yeah, those warnings about heat build-up in big epoxy batches ... that's for real ... the curing process is a polymer-chain-building exothermic reaction ... you can make fire ... no doubt ... don't toss that excess cup of mixed epoxy in the waste backet ... you can burn down your house with epoxy! ... I've set off smoke alarms ... oops!
Cheers
BMac
Edited By BMac on 1204319713
- BMac
- Posts: 132
- Joined: Tue Jan 29, 2008 9:12 pm
- Location: USA
![]() by Thebreeze » Fri Feb 29, 2008 10:35 pm
by Thebreeze » Fri Feb 29, 2008 10:35 pm
BMac....Lots of good alternative ideas. I know about the epoxy. I use it and a good friend does as well. Thanks for the input. It's always nice to see what other people are doing to fix problems.
- Thebreeze
- Posts: 610
- Joined: Sat Apr 07, 2007 10:13 pm
- Location: San Francisco Bay Area
![]() by Joseph » Fri Feb 29, 2008 11:05 pm
by Joseph » Fri Feb 29, 2008 11:05 pm
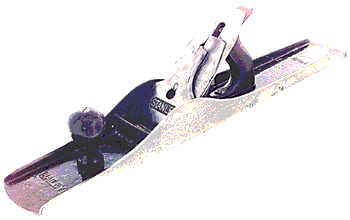
I beg to differ a bit on the plane.
Let me state first that yes I think you can get good results with a plane.
I’ve got numerous planes: hand and power.
If I had a drum shell with a very uneven top edge, I would start with a plane(because I already have one…but a rasp would also do) to take down the high areas, and get that surface close to “plane”, then switch to the magic marker and sanding board technique to get a perfectly “plane” top edge, which could then be shaped as desired.
…this coming from the guy who suggested the concrete technique....
The concrete technique is a cheap and readily available version of the sanding board.
I like the sanding board in the pic…choose your grit.
A planeworks best when making long strokes.
Problem is that drum shell top edge is circular and all end grain.
You can’t get a long stroke in there.
A plane can only make a surface flat in relation to the area of its “foot”
Ever see a long (or jointer) plane?…that’s for making a flat surface
Better have a sharp blade in your plane, because hardwood end grain can be tough to plane, and sometimes the blade can grab or “dig” in end grain, especially when you are plane-ing across many end grains…the staves.
.
On the other hand a sanding board (or a concrete sidewalk) is a plane surface.
Just think of it as a large planar milling surface, and by using the
“Slide back and forth” technique alternating with the “rotating” technique, the top edge of the drum shell will gradually mirror that plane surface.
The magic marker on the top edge is a marking gage that will very evidently show any minute low spots.
As soon as all magic maker ink disappears…voila….you have a perfectly “plane” edge.
It’s about as foolproof a technique as you can get….on the other hand, using a hand plane takes a bit of technique.
I’d practice a bit before committing to the drum edge.
Granted there may be some “chattering” due to friction or high spots on the edge as you sand the edge, but that should be of no consequence to the final results, and you can get a feel for minimizing that by not bearing down too heavily. Let the grit do the work.
"Chattering" occurs in a surface planing operation when feeding lumber too fast into the planer, or trying to plane off too much at a time...literally trying to bite off more than the planer can chew, or from a dull blade. The blade is actually bouncing along the surface...as the drum shell seems to bounce along the sanding board or concrete.
Slow down use less pressure. Sanding is taking lots of small bites from the grit.
I like the idea of the reverse sanding board: drumshell upright, sanding board on top. Lighter weight of board (compared to drumshell) should give easy control, and as someone said is a great upper body workout.
Heck you might be able to sell it as an exercise machine on late night TV. :p
If I was obsessed with the idea of a perfectly uniformly shaped top edge, I would…
1) Draw the ideal rounded edge shape
2) Use that drawing to cut out the reverse image of that shape in a piece of wood (ply or lumber) …to make a reverse mold, so to speak. Easy to make. The block doesn’t have to be small..it should be big enough to comfortably hold in the hand. One edge just has to have that reverse profile cut into it.
3) Carefully sand that reverse image so that it perfectly matches(mirrors) your drawn shape.
4) Rough out the shape on the drum edge with a rasp (or judiciously with a sharp plane), using your reverse mold block as a uniformity gage.
4) Line that block with sandpaper, and work your way around the top edge of the drum. You will probably have to refresh the paper one or more times before completion.
Hopefully when you roughed out the shape you got it close, as that will minimize the amount of sanding required with the reverse mold block.
Having that reverse mold sanding block insures uniform results.
Doing it with a rasp by eye may get you close (if you have a good eye) but there will be minor irregularities.
You could probably do a bang up & fast job on the edge profile with a router, but it would require a jig and/or modification to the router base plate.
I wouldn't recommend it for the inexperienced. Someone who does a lot of rebuilds, or a production operation would have that setup.
I agree about epoxy being the best for repairs.
West is kind of runny...its used a lot for "wet out" of fiberglass cloth in boat construction...I built a 37' trimaran with it years ago...(man what a goopy time that was!)
Thixotropic agents are added to thicken it (e.g. Cabosil, Microballons), but when added tend to color the epoxy, white or dark brown.
Epoxy also has a quality known as "gap-filling", which means if you fill a void or crack with it, once it cures( a molecular thing), the resultant glue joint will be uniformly strong across the joint.
Woodworkers glues (Titebond, Elmer's) don't have that quality, and require a tightly clamped joint of the matching wood surfaces. If you have a big crack that you don't want to clamp tightly together, epoxy is a better solution.
Better epoxy product for repair would be 2 part (as all epoxies are) 100% epoxy solids. It's more of a paste, mixed & applied with a putty knife, does not run, can be used in vertical applications
Pic: A long plane, or jointer plane
Edited By Joseph on 1204409170
Attachment: http://mycongaplace.com/forum/eng/uploa ... ointer.gif
-

Joseph - Posts: 286
- Joined: Mon Jan 07, 2008 2:19 pm
- Location: St Augustine FL
![]() by Chupacabra » Fri Feb 29, 2008 11:42 pm
by Chupacabra » Fri Feb 29, 2008 11:42 pm
The "alma" that was mentioned previously which was mounted beneath the bearing edge on the inside of the shell is something new to me. What is that there for? Is that commonly used for staved drums of the calibre of early Gonbops?
... --- ... ... --- ... ...---...
- Chupacabra
- Posts: 349
- Joined: Mon Dec 03, 2007 2:57 am
- Location: Ontario, Canada
![]() by bongosnotbombs » Fri Feb 29, 2008 11:44 pm
by bongosnotbombs » Fri Feb 29, 2008 11:44 pm
The alma is used to protect against the drum losing it's round shape due to the pressure the lugs and skin exert inwards.
Lugs and skin push in as they tighten and then the alma pushes back so your drum stays round.
Lugs and skin push in as they tighten and then the alma pushes back so your drum stays round.
-

bongosnotbombs - Posts: 2865
- Joined: Fri Apr 06, 2007 4:17 am
- Location: San Francisco, Ca
![]() by Chupacabra » Fri Feb 29, 2008 11:47 pm
by Chupacabra » Fri Feb 29, 2008 11:47 pm
"I like the idea of the reverse sanding board: drumshell upright, sanding board on top. Lighter weight of board (compared to drumshell) should give easy control, and as someone said is a great upper body workout.
Heck you might be able to sell it as an exercise machine on late night TV."
I actually tack the sanding board to my workbench top using finishing nails with the tops nipped off. I tack them about halfway in, nip the heads and then slap the board in place. Then I start my work-out!
Edited By Chupacabra on 1204328892
... --- ... ... --- ... ...---...
- Chupacabra
- Posts: 349
- Joined: Mon Dec 03, 2007 2:57 am
- Location: Ontario, Canada
![]() by Joseph » Sat Mar 01, 2008 1:37 am
by Joseph » Sat Mar 01, 2008 1:37 am
Lugs and skin push in as they tighten and then the alma pushes back so your drum stays round.
Lugs and skin are elements that comprise a resultant force vector that tends to want to collapse the top of the drum shell.
Alma is a metal ring or band inside the shell whose strength characteristics are known to be greater than the force vector of the lugs/skin.
Equilibrium
-
Joseph - Posts: 286
- Joined: Mon Jan 07, 2008 2:19 pm
- Location: St Augustine FL
![]() by BMac » Mon Mar 03, 2008 9:30 pm
by BMac » Mon Mar 03, 2008 9:30 pm
About almas ... I've always been ... skeptical.
Now I should clarify, I don't have a single conga with an alma ... I've got a big staved dununba with an internal steel band screwed to every stave, but I don't know how to compare that to an alama.
Anyway, the few alma photos I've seen show pretty thin-band almas ... if I understand the photos correctly. I just have a hard time believing that almas do much.
I'm talking about the steel band type. I'm not questioning whether internal fiber/epoxy composite layers, effectively forming an alma, in some drums strengthen the drums.
Are there other skeptics out there?
I just think a thin band having a diameter of 11 inches or so is not likely to add significant strength. The external bands you see are assumably tension bands. They don't have to be rigid so they can be thin. I'm assuming an internal alma should be rigid ... wouldn't it have to be quite thick to be effective?
Does any difference reside in the this issue between wood and fiberglass conga shells?
Has anybody seen any good alma photos? ... showing thickness? ... removed from the drum?
Just wondering.
BMac
- BMac
- Posts: 132
- Joined: Tue Jan 29, 2008 9:12 pm
- Location: USA
![]() by bongosnotbombs » Mon Mar 03, 2008 10:23 pm
by bongosnotbombs » Mon Mar 03, 2008 10:23 pm
all my fiberglass drums have and alma, but I think it is there for a different purpose.
The bearing edge is shaped by the fiberglass shell curling over in a kind of lip....the alma is inside that lip between the inside of the shell and the edge of the bearing edge, the metal fills up that void, to add strength in that area.
Some other drums have almas to keep the shell round. Wood drums can potentially lose roundness if the staves lose their shape or move. Wood can be smashed, glue can fail, weather, pressure from the skin.
Also wood and metal expand and contract at different rates, and drums rattle and vibrate.
A flat piece of metal parallel to the wood would not be much protection, a round piece or perpendicular piece would add more protection.
Some drums have them, some don't, some very old and well used vintage drums don't have almas and are fine.
-
bongosnotbombs - Posts: 2865
- Joined: Fri Apr 06, 2007 4:17 am
- Location: San Francisco, Ca
![]() by taikonoatama » Mon Mar 03, 2008 11:59 pm
by taikonoatama » Mon Mar 03, 2008 11:59 pm
BMac wrote:I just think a thin band having a diameter of 11 inches or so is not likely to add significant strength. The external bands you see are assumably tension bands. They don't have to be rigid so they can be thin. I'm assuming an internal alma should be rigid ... wouldn't it have to be quite thick to be effective?
I have or have had JCRs, Juniors, and Skin on Skins, all with strong almas the same steel guage as that used for the crown. That's some strong steel.
-

taikonoatama - Posts: 322
- Joined: Tue Mar 29, 2005 10:11 pm
- Location: San Francisco Bay Area
Return to CongaSet and accessories
Who is online
Users browsing this forum: No registered users and 7 guests