Guiro's. Step by Step "how to make" thread - Pics inside, how I made my guiro's.
![]() by ABAKUA » Tue Aug 23, 2005 3:56 am
by ABAKUA » Tue Aug 23, 2005 3:56 am
Hi all.
Ive had much positive feedback relating to my guiro's both by musicians at gigs and also on here, so I thought I would post up step by step instructions and pics for those who would like to take up the challenge and make a guiro, but not too sure on how to go about it.
Now, I do not claim to be an expert on making guiros or chekeres, and by no means do I consider my way the definitive and only way to go about it, it is merely how I have gone about it and come up with what I think is a pretty good result.
Feel free to add comments/suggestions and questions.
Im posting this in order to share some knowledge and creativity and maybe even learn a thing or 2 myself about these wonderful instruments.
I hope you enjoy.
Ok... The beginning.
I had the pleasure of growing my own gourds, once I had planted them, several months later a small seedling popped out and eventually a few weeks later took over most of my back yard, here is a pic of the crop from a few years back.

If growing your own, hopefully you wont go through the heartbreak I went through of seeing several gourds not survive the drying process or die prematurely while on the plant. A sad thing for a gourd grower.
Of all the gourds, 3 survived at this size.
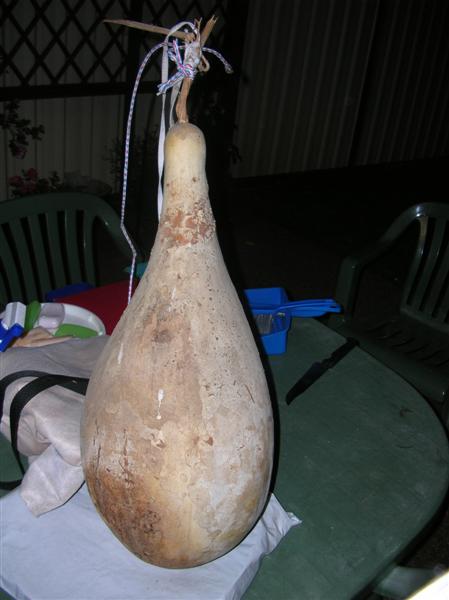
You need to hang them somewhere securely and let them dry naturally somewhere away from the exposed elements, but allowing it to get air and sunlight.
Here is a pic, several months later, now fully dried out and weighing a fraction of what it did when it came off the plant.

Below: The gourd is removed from its hanging position now fully dried out and hard.
Edited By ABAKUA on 1124786715
Attachment: http://mycongaplace.com/forum/eng/uploa ... CN1175.JPG
Ive had much positive feedback relating to my guiro's both by musicians at gigs and also on here, so I thought I would post up step by step instructions and pics for those who would like to take up the challenge and make a guiro, but not too sure on how to go about it.
Now, I do not claim to be an expert on making guiros or chekeres, and by no means do I consider my way the definitive and only way to go about it, it is merely how I have gone about it and come up with what I think is a pretty good result.
Feel free to add comments/suggestions and questions.
Im posting this in order to share some knowledge and creativity and maybe even learn a thing or 2 myself about these wonderful instruments.
I hope you enjoy.
Ok... The beginning.
I had the pleasure of growing my own gourds, once I had planted them, several months later a small seedling popped out and eventually a few weeks later took over most of my back yard, here is a pic of the crop from a few years back.
If growing your own, hopefully you wont go through the heartbreak I went through of seeing several gourds not survive the drying process or die prematurely while on the plant.
Of all the gourds, 3 survived at this size.
You need to hang them somewhere securely and let them dry naturally somewhere away from the exposed elements, but allowing it to get air and sunlight.
Here is a pic, several months later, now fully dried out and weighing a fraction of what it did when it came off the plant.
Below: The gourd is removed from its hanging position now fully dried out and hard.
Edited By ABAKUA on 1124786715
Attachment: http://mycongaplace.com/forum/eng/uploa ... CN1175.JPG
-

ABAKUA - Site Admin
- Posts: 3189
- Joined: Mon Nov 29, 2004 11:59 pm
- Location: Earth
![]() by ABAKUA » Tue Aug 23, 2005 3:58 am
by ABAKUA » Tue Aug 23, 2005 3:58 am
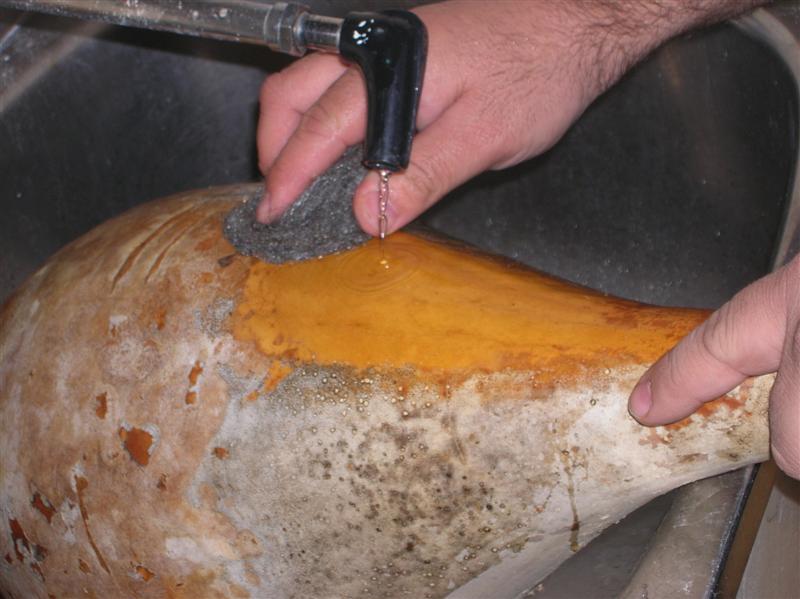
You will need 3 pieces of mild steel wool to complete cleaning of a gourd this size.
Using the steel wool and some water, scrub the dried exterior surface to reveal the nice tanned colour of the grain of the gourd.
Attachment: http://mycongaplace.com/forum/eng/uploa ... CN1176.JPG
Using the steel wool and some water, scrub the dried exterior surface to reveal the nice tanned colour of the grain of the gourd.
Attachment: http://mycongaplace.com/forum/eng/uploa ... CN1176.JPG
-
ABAKUA - Site Admin
- Posts: 3189
- Joined: Mon Nov 29, 2004 11:59 pm
- Location: Earth
![]() by ABAKUA » Tue Aug 23, 2005 4:06 am
by ABAKUA » Tue Aug 23, 2005 4:06 am
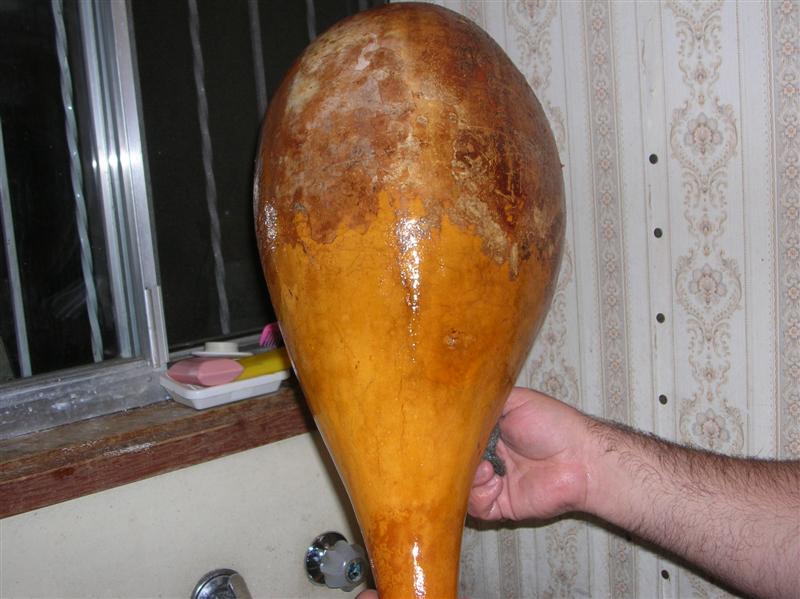
Should look like this once all done.

Dry the gourd thoroughly with a towel.
(note, pic taken while gourd was still wet)
Next.....
You will need to decide where to cut the neck of the gourd to have the opening of the guiro.
Once you have penciled in where abouts you would like the mouth of the guiro, cut higher than the line so you can sand down to the correct line later on.
Here are some of the tools you will require/tools I used.
Attachment: http://mycongaplace.com/forum/eng/uploa ... CN1186.JPG
-
ABAKUA - Site Admin
- Posts: 3189
- Joined: Mon Nov 29, 2004 11:59 pm
- Location: Earth
![]() by ABAKUA » Tue Aug 23, 2005 4:13 am
by ABAKUA » Tue Aug 23, 2005 4:13 am
Sawing off and cutting the neck.
Note: All work carried out was a 2 man job as I prefer not to clamp the gourds as they could break, 1 person holds the gourd, the other works on the cutting/carving etc.
If you are going to use clamps, you do so at your own risk, please be careful and protect the gourd adequately so you dont crack it.


Inside the gourd will look like this:

Tip the gourd upside down to begin emptying out the seeds/dried material from inside.
*note, try to seperate the seeds and save them for your next crop!

After alot of scooping, scratching, filing and sanding the rest of the guts come out... Here I have seperated the seeds to the left of the pic, will be used for future planting...

Inside cleaned up enough for now, next step is preparing the template for the grooves.

Note: All work carried out was a 2 man job as I prefer not to clamp the gourds as they could break, 1 person holds the gourd, the other works on the cutting/carving etc.
If you are going to use clamps, you do so at your own risk, please be careful and protect the gourd adequately so you dont crack it.
Inside the gourd will look like this:
Tip the gourd upside down to begin emptying out the seeds/dried material from inside.
*note, try to seperate the seeds and save them for your next crop!
After alot of scooping, scratching, filing and sanding the rest of the guts come out... Here I have seperated the seeds to the left of the pic, will be used for future planting...
Inside cleaned up enough for now, next step is preparing the template for the grooves.
-
ABAKUA - Site Admin
- Posts: 3189
- Joined: Mon Nov 29, 2004 11:59 pm
- Location: Earth
![]() by ABAKUA » Tue Aug 23, 2005 4:16 am
by ABAKUA » Tue Aug 23, 2005 4:16 am
Work out the measurements and dimensions of the guiro.
Transfer that info to paper and work out how big you will make your template.
Use a pencil so any errors can be easily wiped off the gourd with a damp clothe or sponge.
Attachment: http://mycongaplace.com/forum/eng/uploa ... CN1182.JPG
Transfer that info to paper and work out how big you will make your template.
Use a pencil so any errors can be easily wiped off the gourd with a damp clothe or sponge.
Attachment: http://mycongaplace.com/forum/eng/uploa ... CN1182.JPG
-
ABAKUA - Site Admin
- Posts: 3189
- Joined: Mon Nov 29, 2004 11:59 pm
- Location: Earth
![]() by ABAKUA » Tue Aug 23, 2005 4:24 am
by ABAKUA » Tue Aug 23, 2005 4:24 am
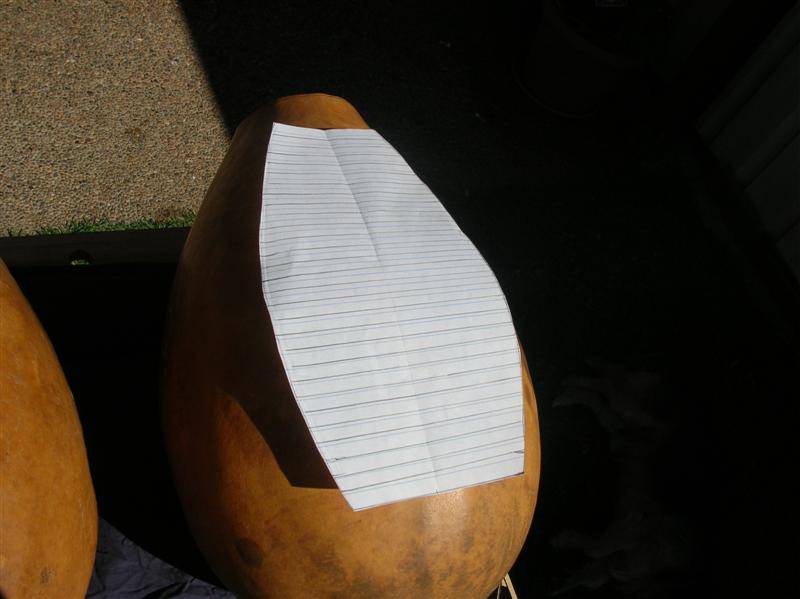
Cut out the template and trace onto gourd using a lead pencil.
I use this method to ensure pattern will be equal in dimension on both sides.
Attachment: http://mycongaplace.com/forum/eng/uploa ... CN1183.JPG
I use this method to ensure pattern will be equal in dimension on both sides.
Attachment: http://mycongaplace.com/forum/eng/uploa ... CN1183.JPG
-
ABAKUA - Site Admin
- Posts: 3189
- Joined: Mon Nov 29, 2004 11:59 pm
- Location: Earth
![]() by ABAKUA » Tue Aug 23, 2005 4:27 am
by ABAKUA » Tue Aug 23, 2005 4:27 am
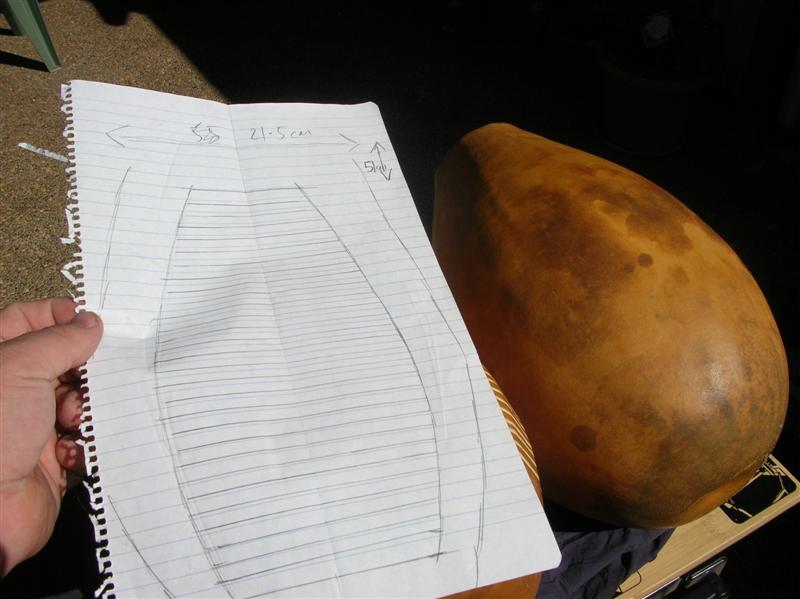
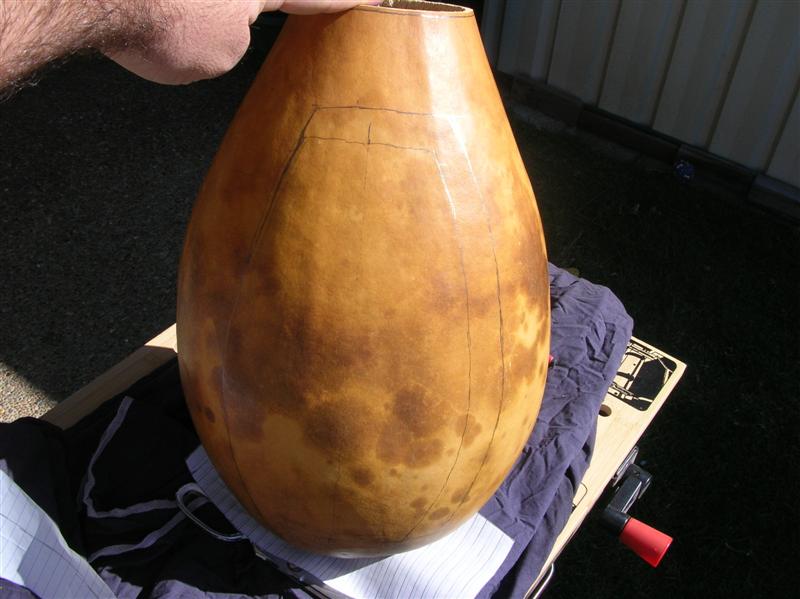
In this case, once I had transferred the template onto the gourd, I realised it was too small for my liking. I extended the height and width of the pattern by approx 3cm as seen below.
I was happy with this template.
Next comes the commencement of the carving.
Attachment: http://mycongaplace.com/forum/eng/uploa ... CN1185.JPG
I was happy with this template.
Next comes the commencement of the carving.
Attachment: http://mycongaplace.com/forum/eng/uploa ... CN1185.JPG
-
ABAKUA - Site Admin
- Posts: 3189
- Joined: Mon Nov 29, 2004 11:59 pm
- Location: Earth
![]() by ABAKUA » Tue Aug 23, 2005 4:31 am
by ABAKUA » Tue Aug 23, 2005 4:31 am
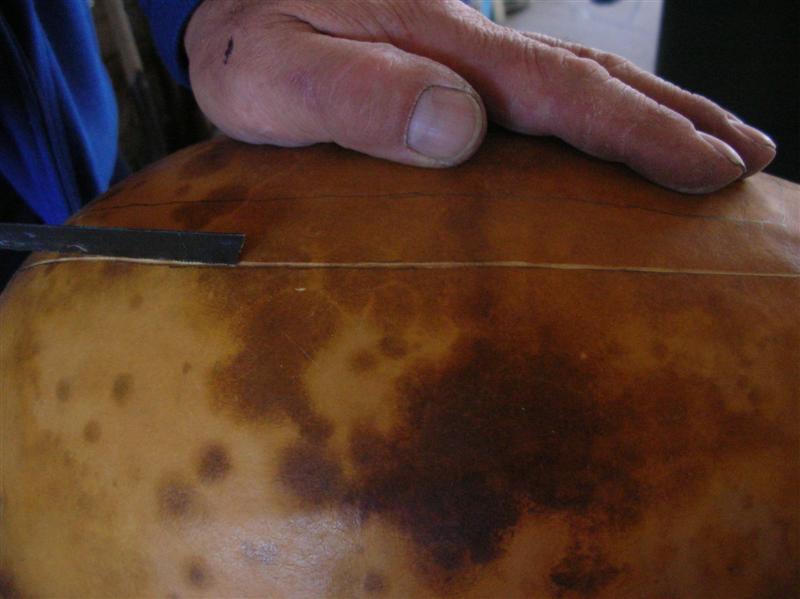
Use a thin, flexible metal file saw to gently cut into the gourd, not all the way through of course. This cuts in the outline of the grooves and its surrounding conga like pattern as seen in pics.
(again, I do not use clamps for fear of cracking the gourd, a 2nd person holds the gourd securely, the other person works the gourd.)
Attachment: http://mycongaplace.com/forum/eng/uploa ... CN1187.JPG
(again, I do not use clamps for fear of cracking the gourd, a 2nd person holds the gourd securely, the other person works the gourd.)
Attachment: http://mycongaplace.com/forum/eng/uploa ... CN1187.JPG
-
ABAKUA - Site Admin
- Posts: 3189
- Joined: Mon Nov 29, 2004 11:59 pm
- Location: Earth
![]() by ABAKUA » Tue Aug 23, 2005 4:33 am
by ABAKUA » Tue Aug 23, 2005 4:33 am
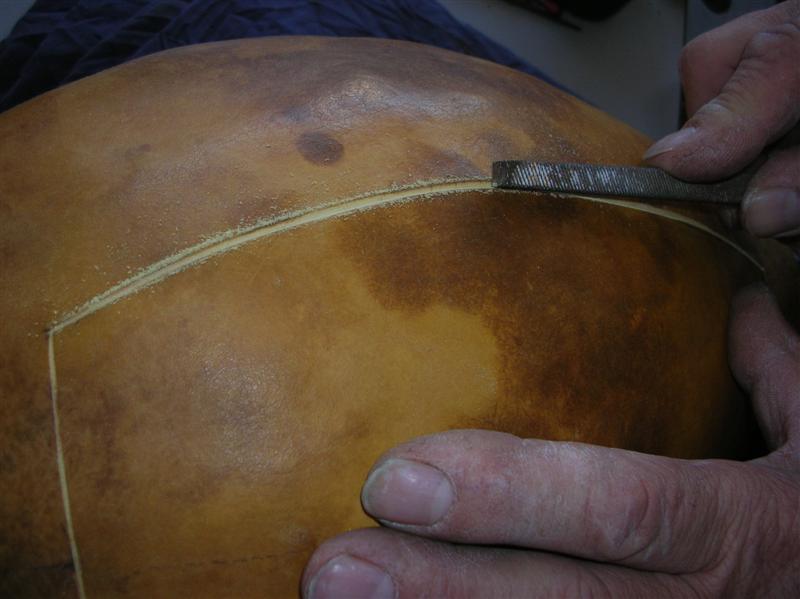
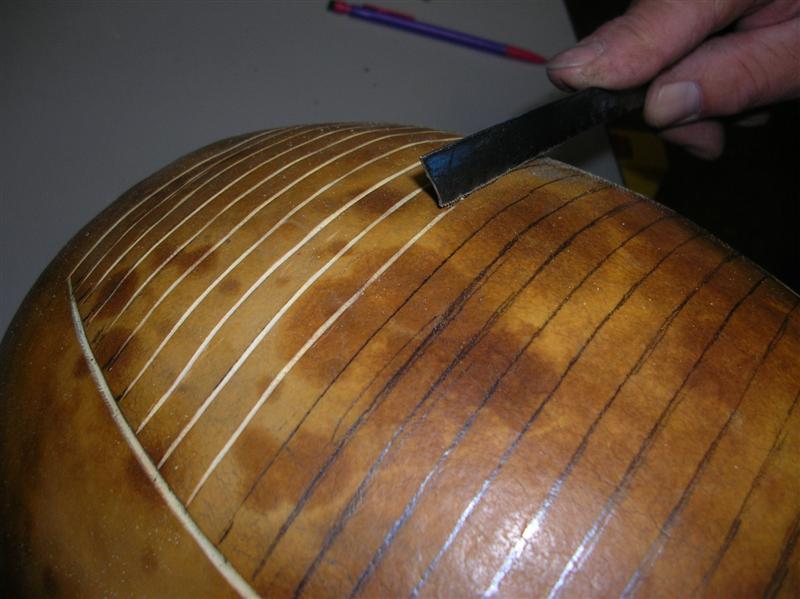
Use a squared or triangular metal file to perfect and enlarge the outer groove.
Attachment: http://mycongaplace.com/forum/eng/uploa ... CN1191.JPG
Attachment: http://mycongaplace.com/forum/eng/uploa ... CN1191.JPG
-
ABAKUA - Site Admin
- Posts: 3189
- Joined: Mon Nov 29, 2004 11:59 pm
- Location: Earth
![]() by ABAKUA » Tue Aug 23, 2005 4:36 am
by ABAKUA » Tue Aug 23, 2005 4:36 am
Using the flexible metal saw, or a piece of thin cardboard, draw the lines to mark where your grooves will go.
Keep in mind that you will need to allow a larger space between the lines as when you start to saw/file in the grooves, they start to get closer together once all done...
Edited By ABAKUA on 1124771803
Attachment: http://mycongaplace.com/forum/eng/uploa ... CN1192.JPG
Keep in mind that you will need to allow a larger space between the lines as when you start to saw/file in the grooves, they start to get closer together once all done...
Edited By ABAKUA on 1124771803
Attachment: http://mycongaplace.com/forum/eng/uploa ... CN1192.JPG
-
ABAKUA - Site Admin
- Posts: 3189
- Joined: Mon Nov 29, 2004 11:59 pm
- Location: Earth
![]() by ABAKUA » Tue Aug 23, 2005 4:38 am
by ABAKUA » Tue Aug 23, 2005 4:38 am
Here, all the lines for the grooves are drawn in and the outer pattern is done.
Next step will be the marking of the grooves.
Attachment: http://mycongaplace.com/forum/eng/uploa ... CN1193.JPG
Next step will be the marking of the grooves.
Attachment: http://mycongaplace.com/forum/eng/uploa ... CN1193.JPG
-
ABAKUA - Site Admin
- Posts: 3189
- Joined: Mon Nov 29, 2004 11:59 pm
- Location: Earth
![]() by ABAKUA » Tue Aug 23, 2005 4:41 am
by ABAKUA » Tue Aug 23, 2005 4:41 am
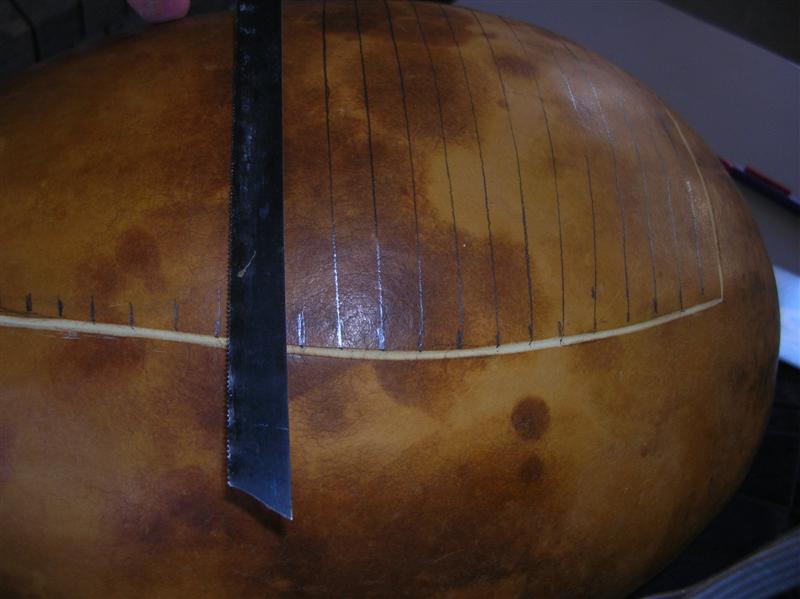
Using the same metal file saw blade, slowly trace the lines to cut in to the gourd. Again, pls take precaution to not cut in too deeply, all you need to do is merely create a small groove in it so that the file can eat away at the rest of it to make the groove. Only go approx 1-2mm into the gourd.
Attachment: http://mycongaplace.com/forum/eng/uploa ... CN1194.JPG
Attachment: http://mycongaplace.com/forum/eng/uploa ... CN1194.JPG
-
ABAKUA - Site Admin
- Posts: 3189
- Joined: Mon Nov 29, 2004 11:59 pm
- Location: Earth
![]() by ABAKUA » Tue Aug 23, 2005 4:43 am
by ABAKUA » Tue Aug 23, 2005 4:43 am
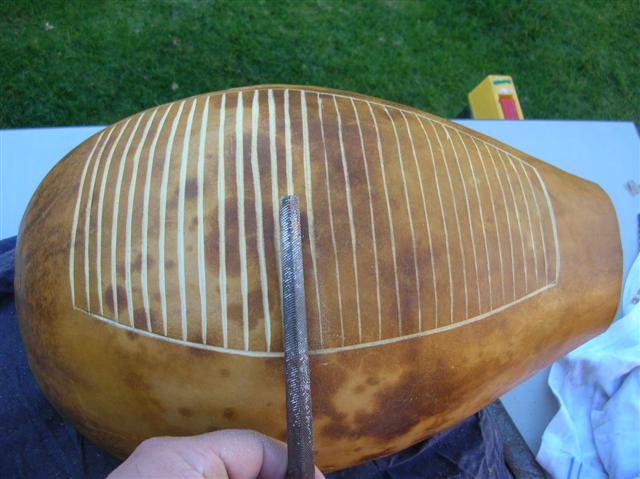
Here, all the grooves have been marked with the metal saw blade.
Next step will be eating away through the lines you have marked using a metal file to shape and perfect the grooves to your desired effect.
Attachment: http://mycongaplace.com/forum/eng/uploa ... CN1196.JPG
Next step will be eating away through the lines you have marked using a metal file to shape and perfect the grooves to your desired effect.
Attachment: http://mycongaplace.com/forum/eng/uploa ... CN1196.JPG
-
ABAKUA - Site Admin
- Posts: 3189
- Joined: Mon Nov 29, 2004 11:59 pm
- Location: Earth
![]() by ABAKUA » Tue Aug 23, 2005 4:46 am
by ABAKUA » Tue Aug 23, 2005 4:46 am
Using the metal file, slowly go over the lines you have cut and file in the lines of the grooves to a depth less than half the thickness of the gourd. This will maintain a good sound and make playing an ease and the scraper wont get stuck in between the grooves. It also assures your gourd will maintain strength and not break in the grooves because you made the grooves too deep.
Attachment: http://mycongaplace.com/forum/eng/uploa ... CN1199.JPG
Attachment: http://mycongaplace.com/forum/eng/uploa ... CN1199.JPG
-
ABAKUA - Site Admin
- Posts: 3189
- Joined: Mon Nov 29, 2004 11:59 pm
- Location: Earth
Who is online
Users browsing this forum: No registered users and 30 guests