refinishing congas
61 posts
• Page 2 of 5 • 1, 2, 3, 4, 5
![]() by GuruPimpi » Sat Mar 31, 2007 9:45 am
by GuruPimpi » Sat Mar 31, 2007 9:45 am
Mmmm MMMMM! These are some real fine Chocolattes! 
Onile, great tip for sanding along the grains...
AlexV, You are on the right track
Primoz
Onile, great tip for sanding along the grains...
AlexV, You are on the right track
Primoz
It's about liberating yourself, man!!!
http://www.myspace.com/odfranclnamozgani
http://www.myspace.com/perkakns
http://www.myspace.com/strojmachine
http://www.myspace.com/robertjerele
http://www.myspace.com/odfranclnamozgani
http://www.myspace.com/perkakns
http://www.myspace.com/strojmachine
http://www.myspace.com/robertjerele
-

GuruPimpi - Posts: 487
- Joined: Thu Dec 09, 2004 2:12 am
- Location: Slovenija
![]() by Congaroo » Sat Mar 31, 2007 1:13 pm
by Congaroo » Sat Mar 31, 2007 1:13 pm
AlexV, I´m sorry, I thought the red ones are already finished by you :laugh: oops
Onile, what a nice brown colour! Makes me wanna eat some chocolate now ^^
..::Congaroo::..
Onile, what a nice brown colour! Makes me wanna eat some chocolate now ^^
..::Congaroo::..
- Congaroo
- Posts: 7
- Joined: Fri Mar 09, 2007 3:22 pm
- Location: Germany -> Munich, hometown of the Oktoberfest
![]() by AlexV » Sat Mar 31, 2007 1:15 pm
by AlexV » Sat Mar 31, 2007 1:15 pm
saludos onile! man those gio's son candela papa. that's what i'm shooting for. what you're looking at was my first try. i'm going to put in some work today, a ver como salen. quick question: by sanding with the grain do you mean from the top to the bottom of the drum? because i sure didn't sand across the drum. it might just look that way because of the wood grains characteristics. i'm going right now to work on it! take it easy.
-

AlexV - Posts: 122
- Joined: Thu Nov 02, 2006 5:05 pm
- Location: Chicago, IL
![]() by onile » Sat Mar 31, 2007 3:57 pm
by onile » Sat Mar 31, 2007 3:57 pm
Vaya Mi Pana!
Yeah that's what I thought when I first looked at the earlier pic you posted, I thought it looked like that, but I was wrong! Also, I sanded them como un loco sin bandera Papa! That's actually the hardest part of the whole project, the sanding! Are you using an electric sander or are you doing it by hand? The latter being the hardest!
Afterwards you'll have the best drums on the block! Why? because you did 'em!
Suave!
Onile!
Que Nsambi les acutare pa' siempre!
-

onile - Posts: 1259
- Joined: Sun Sep 11, 2005 5:23 pm
- Location: USA
![]() by AlexV » Sat Mar 31, 2007 9:21 pm
by AlexV » Sat Mar 31, 2007 9:21 pm
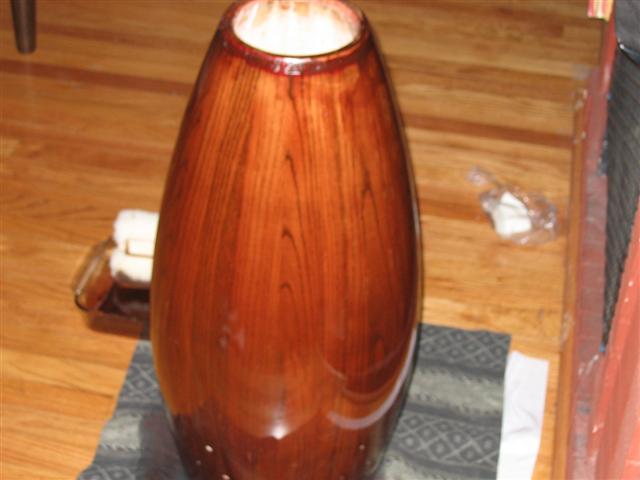
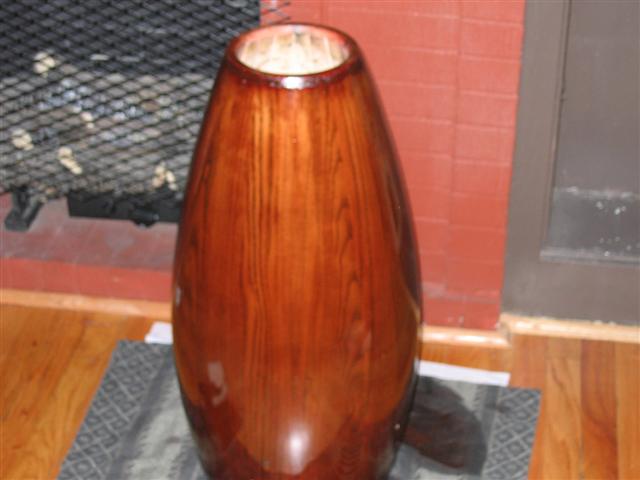
hey guys. here's a quick pic of the quinto again. had to sand and restain. looking better i think. saludos onile!
Attachment: http://mycongaplace.com/forum/eng/uploa ... Small_.jpg
Attachment: http://mycongaplace.com/forum/eng/uploa ... Small_.jpg
-
AlexV - Posts: 122
- Joined: Thu Nov 02, 2006 5:05 pm
- Location: Chicago, IL
![]() by JimG » Sat Mar 31, 2007 9:30 pm
by JimG » Sat Mar 31, 2007 9:30 pm
AlexV,
I'm not a professional, but I have refinished many pieces of furniture. In that amateur opinion, the spotty areas appear to be either too much sanding or not enough. I would bet the former, which is good. Take the finish all the way down to bare wood. It should all sand like a bare 2 x 4. Any area that looks different before stain will look worse after stain. Bare wood will absorb the new color and be darker, while the part that is not bare wood still holds some oil from the previous stain and resists the new coating making it lighter.
Once down to bare wood use a pre stain wood treatment. MinWax makes a good pre treatment. It kinda moistens up the wood and allows the stain to penetrate more evenly. And then I may be wrong which is why they all know me by first name at Lowe's. :;):
I'm curious as to the method of getting the outer poly coat off. Did you sand that too?
JimG
Do not go where the path may lead, go instead where there is no path and leave a trail. -- Ralph Waldo Emerson
- JimG
- Posts: 55
- Joined: Fri Jan 19, 2007 3:28 pm
- Location: Indiana
![]() by JimG » Sat Mar 31, 2007 9:32 pm
by JimG » Sat Mar 31, 2007 9:32 pm
Ja, ditto. That looks much better. Well done. Nothing better than bringing a piece of wood back to life. And when you can bang on that piece of wood,,,,even better!
JimG
JimG
Do not go where the path may lead, go instead where there is no path and leave a trail. -- Ralph Waldo Emerson
- JimG
- Posts: 55
- Joined: Fri Jan 19, 2007 3:28 pm
- Location: Indiana
![]() by AlexV » Sun Apr 01, 2007 1:29 am
by AlexV » Sun Apr 01, 2007 1:29 am
JimG, onile, thanks guys. i had a tough time today. JimG, yeah i sanded that drum.i bought a paint stripper from home depot trying to speed up the progress and it didn't work for jack. it was a spray, i let it sit for 15-20-30-45 minutes and each time i tried to strip hardly anything would come off. that red that was sprayed on those drums in china is potent. when sanding the first drum it had a horrible chemical odor. i was trying to bypass that today. no such luck. when i was finally fed up i wiped them down and dried them so i could sand and my electric sander died. so now i have to go buy a new sander so i can finish this already.
-
AlexV - Posts: 122
- Joined: Thu Nov 02, 2006 5:05 pm
- Location: Chicago, IL
![]() by akdom » Sun Apr 01, 2007 9:37 am
by akdom » Sun Apr 01, 2007 9:37 am
Hi all
I had a pair of Meinl marathon series. They were color burgundi. Very nice but after a few years, the glossy finish did chip.
I then decided to remove the paint and revarnish them.
I sanded down the paint and used some marin "not glossy" varnish.
I unfortunately do not have any pics since I sold these drums, but the result was amazing.
I loved the wood finish. It looked much better.
And what a satisfaction to rebuild drums.
I now have a set of 3 drums made out of fiber. They are all beat up and scratched, but I love them.
B

-

akdom - Posts: 607
- Joined: Tue Jan 21, 2003 10:16 pm
- Location: France
![]() by deadhead » Fri Apr 06, 2007 2:23 pm
by deadhead » Fri Apr 06, 2007 2:23 pm
i bought a paint stripper from home depot trying to speed up the progress and it didn't work for jack. it was a spray, i let it sit for 15-20-30-45 minutes and each time i tried to strip hardly anything would come off.
I had a similar problem with a tom tom I am refinishing. I bought some of the same stuff, an areosal can of paint/varnish stripper. If anything it made more of a mess than did any good. I sprayed and sanded probably 10 times, but never had any luck removing the clear coat. I ended up giving up on it and the tom has been in the closet half way sanded for a month or so. Does anyone know of something that actually works for stripping instead of making a sticky mess that cakes on to your sandpaper making it unusable? I'de love to refinish my LP Classics in a nice dark walnut finish, but I'm afraid I'll have too much of a problem getting that damn clear coat off the drums and I'll be without congas for months, and thats no bueno.
- deadhead
- Posts: 328
- Joined: Tue Oct 17, 2006 12:59 am
- Location: austin, tx
![]() by bongosnotbombs » Fri Apr 06, 2007 3:33 pm
by bongosnotbombs » Fri Apr 06, 2007 3:33 pm
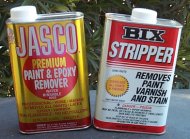
Hey all,
I come from a housepainting background, the stripper you want is
Jasco, comes in a can, applies like a gel, it works good, I stripped a
ships hold door to use as a table, thick varnish on that. Remove the paint and
stripper with a thin putty knife, scraper, sand when dry.
I second the stain prepper to get a better finish, there is also a product,
called a wood brightener, we would use on shingle houses before
staining, that cleans all the shingles evenly for the stain, i.e. water damage,
mold, etc.
Try getting products from a paint store, instead of Lowes, Home Despot,
you get more variety of products and knowledge..
Edited By bongosnotbombs on 1175873833
Attachment: http://mycongaplace.com/forum/eng/uploa ... ssmall.jpg
-

bongosnotbombs - Posts: 2865
- Joined: Fri Apr 06, 2007 4:17 am
- Location: San Francisco, Ca
61 posts
• Page 2 of 5 • 1, 2, 3, 4, 5
Return to CongaSet and accessories
Who is online
Users browsing this forum: No registered users and 30 guests